> ## Documentation Index
> Fetch the complete documentation index at: https://koreai-content-gov.mintlify.site/llms.txt
> Use this file to discover all available pages before exploring further.
# BYOK Integration Guide for Azure
[Back to Admin Console](/ai-for-service/administration/overview)
Bring Your Own Key (BYOK) encryption in Kore's public cloud SaaS enables enterprises to retain complete control over their encryption keys while protecting sensitive data. With BYOK, organizations use their own Customer Master Keys (CMKs) to encrypt app data, ensuring stronger security and compliance.
Kore's BYOK solution integrates with external key management systems such as Azure Key Vault. Customers retain ownership of their encryption keys while leveraging Kore's secure, scalable cloud platform with HSM-backed keys.
## Prerequisites
* Active Kore.ai subscription (platform.kore.ai) with BYOK enabled.
* Azure account with administrative access to the Key Vault service.
* Permissions to create Key Vault.
## Integration Process
The BYOK integration requires coordination between you (the customer) and the Kore.ai support team. The integration involves five main steps:
1. [Authorize the Platform Application in Your Tenant](#step-1-authorize-the-kore-application-in-your-tenant): Register our application in your Azure tenant for secure access to Key Vault.
2. [Prepare Key Vault and Key](#step-2-prepare-key-vault-and-key): Create an Azure Key Vault and generate an RSA key. Note the Key Vault URI and Key Identifier for integration purposes.
3. [Configure Key Vault Access](#step-3-configure-key-vault-access): Assign the **Key Vault Crypto User** role to the Platform application in Key Vault IAM to enable cryptographic operations.
4. [Share Information](#step-4-share-information-with-kore-ai): Share your Tenant ID, Key Vault URI, and Key Name with Kore.ai to complete the integration and approve network access.
5. [Configure Network Access](#step-5-configure-network-access): Enable a private endpoint, or allow trusted Microsoft services and platform IP ranges.
### Step 1: Authorize the Platform Application in Your Tenant
**Option 1: Admin Consent URL**
1. Log in to the Azure portal as a Global Administrator.
2. Navigate to the following URL (replace `` and ``):
`https://login.microsoftonline.com//adminconsent?client_id=`
3. Review permissions and grant admin consent.
**Option 2: Azure CLI**
1. Open Azure Cloud Shell or install Azure CLI locally.
2. Login as Global Administrator: `az login`
3. Create service principal: `az ad sp create --id ''`
This step registers our application in your tenant, enabling it to securely interact with your Key Vault.
### Step 2: Prepare Key Vault and Key
1. In Azure Portal, create a **Key Vault** if one doesn't exist.
2. Configure:
* **Resource group**: Select or create
* **Key vault name**: Choose a unique name
* **Region**: Select appropriate region
* **Pricing tier**: Standard or Premium
3. Note the Key Vault URI: `https://.vault.azure.net/`
Create RSA Key (if needed)
1. In your Key Vault, navigate to **Keys**
2. Click **Generate/Import**
3. Configure:
* **Options**: Generate
* **Name**: Choose a descriptive name
* **Key type**: RSA
* **RSA key size**: 2048 or 4096
4. Note the Key Identifier URL.
### Step 3: Configure Key Vault Access
Assign Key Vault Permissions
1. Navigate to **Access control (IAM)** in your Key Vault.
2. Click **Add role assignment**.
3. Configure:
* **Role**: Key Vault Crypto User
* **Assign access to**: User, group, or service principal
* **Members**: Search for the Platform application name
4. Click **Review + assign**
### Step 4: Share Information with Kore.ai
[Contact Kore.ai support](https://support.kore.ai/) and provide the following information:
* Your **Tenant ID** (found in **Microsoft Entra ID** > **Properties** in the Azure portal)
* The **Key Vault URI**
* The **Key Name**
### Step 5: Configure Network Access
1. **Recommended:** Enable a private endpoint for access to the platform.
2. Alternatively, allow trusted Microsoft services and Platform IP ranges.
## Configure BYOK Encryption in AI for Service
You can enable BYOK encryption by configuring it in the AI for Service Admin Console. When you configure an Azure BYOK entry, you can choose between the Standard and API Gateway setup types.
Choose how the Platform reaches your Azure Key Vault.
| Setup Type | Description |
| --------------- | ----------------------------------------------------------------------------------------------------------------- |
| **Standard** | Platform connects directly to your Azure Key Vault using the Platform multi-tenant app registered in your tenant. |
| **API Gateway** | Platform calls your HTTPS gateway, which fronts vault operations. Platform never talks to Azure directly. |
### Standard Encryption
Follow these steps:
1. In the Admin Console, go to **Enterprise Key** and click **Create New Key**.
2. For **Cloud Provider**, select **Azure**.
3. For **Setup Type**, select **Standard**.
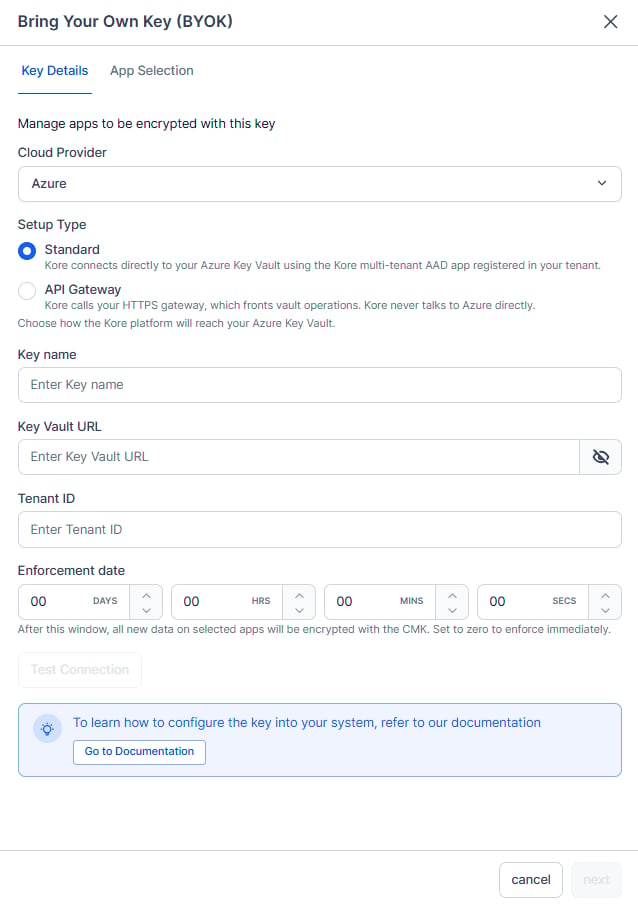 4. Enter Azure Details:
* **Cloud Provider**: Azure.
* **Key identifier**: Enter your Key Vault URL.
* **Authentication credentials**: Enter your Role ARN Tenant ID.
5. Set **Enforcement Date**: Choose when encryption will begin. This is the date your CMK starts encrypting data.
You can modify the CMK and retest until the enforcement date. After this date, you can only rotate the key or update which apps are encrypted.
6. Test Configuration: Click **Test Configuration** to validate the connection.
The system will test the connection to your Azure, authentication, encryption, and decryption operations. Verify all tests pass before continuing.
7. Select Apps: Click **Next** to view all apps in your workspace.
* All apps are selected by default.
* Deselect any apps you want to keep on the default Kore.ai encryption.
### API Gateway
**Before you begin**
Make sure you have the following information:
* Key Vault URL
* Tenant ID
* Token API URL
* Client ID
* Client secret
* Token API headers, if required
* Key URL
* Version URL
* Wrap URL
* Unwrap URL
* Vault operation API headers, if required
Follow these steps:
1. In the Admin Console, go to **Enterprise Key** and click **Create New Key**.
2. For **Cloud Provider**, select **Azure**.
3. For **Setup Type**, select **API Gateway**.
4. Enter Azure Details:
* **Cloud Provider**: Azure.
* **Key identifier**: Enter your Key Vault URL.
* **Authentication credentials**: Enter your Role ARN Tenant ID.
5. Set **Enforcement Date**: Choose when encryption will begin. This is the date your CMK starts encrypting data.
You can modify the CMK and retest until the enforcement date. After this date, you can only rotate the key or update which apps are encrypted.
6. Test Configuration: Click **Test Configuration** to validate the connection.
The system will test the connection to your Azure, authentication, encryption, and decryption operations. Verify all tests pass before continuing.
7. Select Apps: Click **Next** to view all apps in your workspace.
* All apps are selected by default.
* Deselect any apps you want to keep on the default Kore.ai encryption.
### API Gateway
**Before you begin**
Make sure you have the following information:
* Key Vault URL
* Tenant ID
* Token API URL
* Client ID
* Client secret
* Token API headers, if required
* Key URL
* Version URL
* Wrap URL
* Unwrap URL
* Vault operation API headers, if required
Follow these steps:
1. In the Admin Console, go to **Enterprise Key** and click **Create New Key**.
2. For **Cloud Provider**, select **Azure**.
3. For **Setup Type**, select **API Gateway**.
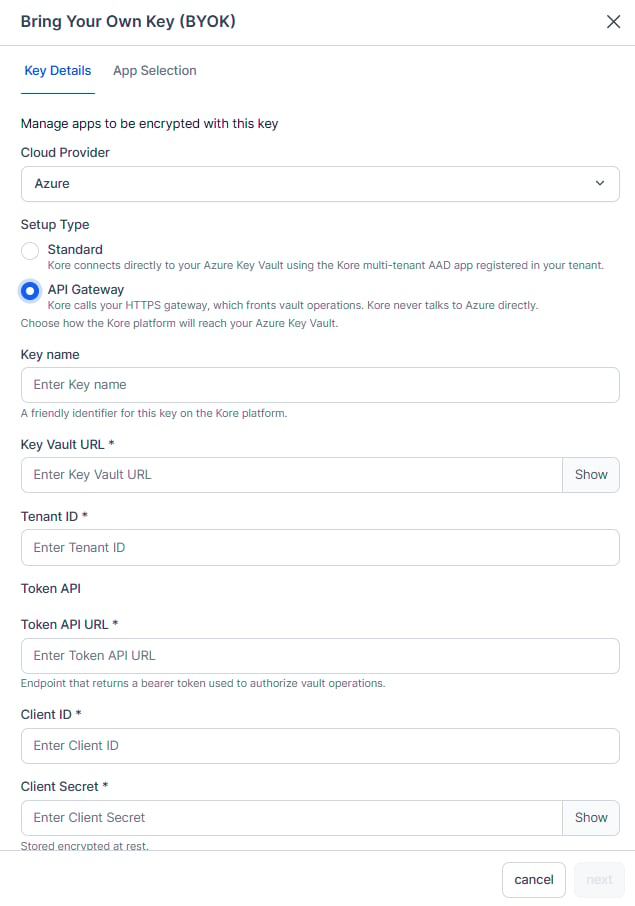 4. Enter the following details:
* **Key name**: Enter a friendly identifier for the key on the platform.
* **Key Vault URL**: Enter the Key Vault URL.
* **Tenant ID**: Enter the tenant ID.
* **Token API**
* **Token API URL**: Enter the endpoint that returns a bearer token used to authorize vault operations.
* **Client ID**: Enter the client ID used to obtain the bearer token.
* **Client Secret**: Enter the client secret used to obtain the bearer token.
* **Token API Headers (optional)**: Enter a JSON object containing additional headers to send with every token request.
* **Vault Operation APIs**
* **Key URL**: Enter the endpoint that returns metadata for the current CMK, including its ID, latest version, and allowed operations.
* **Version URL**: Enter the endpoint that returns the current key version. The platform polls this endpoint to detect key rotation.
* **Wrap URL**: Enter the endpoint used to encrypt a data key with the CMK.
* **Unwrap URL**: Enter the endpoint used to decrypt a wrapped data key.
* **Vault Operation API Headers (optional)**: Enter any additional headers required by the vault operation APIs.
5. Set **Enforcement Date**: Choose when encryption will begin. This is the date your CMK starts encrypting data.
You can modify the CMK and retest until the enforcement date. After this date, you can only rotate the key or update which apps are encrypted.
6. Test Configuration: Click **Test Configuration** to validate the connection.
The system will test the connection to your Azure, authentication, encryption, and decryption operations. Verify all tests pass before continuing.
7. Select Apps: Click **Next** to view all apps in your workspace.
* All apps are selected by default.
* Deselect any apps you want to keep on the default Kore.ai encryption.
If you change any configuration field after a successful **Test Configuration**, the test result is cleared. Run **Test Configuration** again before saving the entry.
## Validation (Optional)
After the enforcement date, verify that encryption is working by using one of the following methods:
### Option 1: View Analytics
Check analytics data for recent chat interactions to confirm that encrypted data is accessible.
### Option 2: Test Application Authorization
Open the application and run Authorization Profiles and Dialogs.
**Example:**
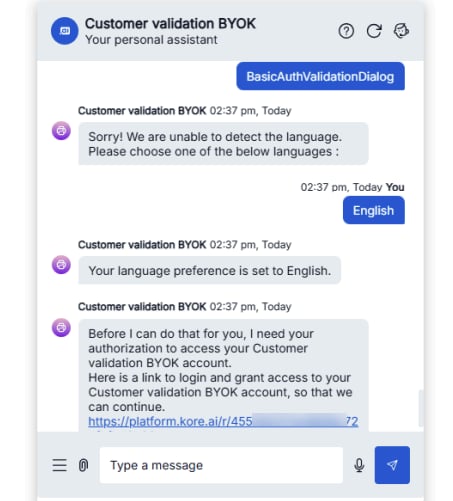
* Execute **BasicAuthValidationDialog**.
* When the app displays the authorization link, click the link and enter the credentials (**admin/password**).\
4. Enter the following details:
* **Key name**: Enter a friendly identifier for the key on the platform.
* **Key Vault URL**: Enter the Key Vault URL.
* **Tenant ID**: Enter the tenant ID.
* **Token API**
* **Token API URL**: Enter the endpoint that returns a bearer token used to authorize vault operations.
* **Client ID**: Enter the client ID used to obtain the bearer token.
* **Client Secret**: Enter the client secret used to obtain the bearer token.
* **Token API Headers (optional)**: Enter a JSON object containing additional headers to send with every token request.
* **Vault Operation APIs**
* **Key URL**: Enter the endpoint that returns metadata for the current CMK, including its ID, latest version, and allowed operations.
* **Version URL**: Enter the endpoint that returns the current key version. The platform polls this endpoint to detect key rotation.
* **Wrap URL**: Enter the endpoint used to encrypt a data key with the CMK.
* **Unwrap URL**: Enter the endpoint used to decrypt a wrapped data key.
* **Vault Operation API Headers (optional)**: Enter any additional headers required by the vault operation APIs.
5. Set **Enforcement Date**: Choose when encryption will begin. This is the date your CMK starts encrypting data.
You can modify the CMK and retest until the enforcement date. After this date, you can only rotate the key or update which apps are encrypted.
6. Test Configuration: Click **Test Configuration** to validate the connection.
The system will test the connection to your Azure, authentication, encryption, and decryption operations. Verify all tests pass before continuing.
7. Select Apps: Click **Next** to view all apps in your workspace.
* All apps are selected by default.
* Deselect any apps you want to keep on the default Kore.ai encryption.
If you change any configuration field after a successful **Test Configuration**, the test result is cleared. Run **Test Configuration** again before saving the entry.
## Validation (Optional)
After the enforcement date, verify that encryption is working by using one of the following methods:
### Option 1: View Analytics
Check analytics data for recent chat interactions to confirm that encrypted data is accessible.
### Option 2: Test Application Authorization
Open the application and run Authorization Profiles and Dialogs.
**Example:**
* Execute **BasicAuthValidationDialog**.
* When the app displays the authorization link, click the link and enter the credentials (**admin/password**).\
 \\
\\
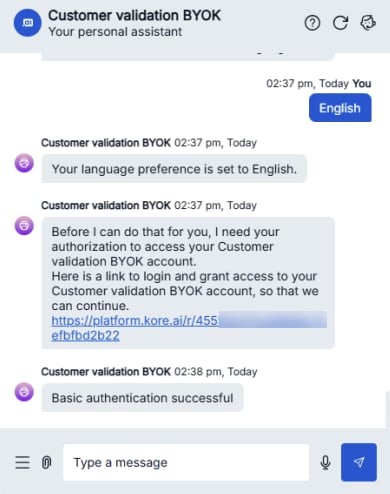 If successful, the system redirects you and displays "Basic authentication successful."
This confirms your encrypted credentials are correctly stored and retrieved using your CMK.
***
## Related Links
* [Azure Key Vault documentation](https://docs.microsoft.com/en-us/azure/key-vault/)
If successful, the system redirects you and displays "Basic authentication successful."
This confirms your encrypted credentials are correctly stored and retrieved using your CMK.
***
## Related Links
* [Azure Key Vault documentation](https://docs.microsoft.com/en-us/azure/key-vault/)